Ja:Ubiquity 0.1.2 User Tutorial: Difference between revisions
(Welcome 翻訳。) |
m (「セキュリティリスク」文言追加) |
||
| (7 intermediate revisions by the same user not shown) | |||
| Line 1: | Line 1: | ||
[[Labs/Ubiquity|戻る]]. | [[Labs/Ubiquity|戻る]]. | ||
[[ja:Ubiquity 0.1.2 User Tutorial|日本語]] [[Labs/Ubiquity/Latest Ubiquity User Tutorial|English]] [[es:Ubiquity 0.1.2 User Tutorial|español]] [[zh-CN:Ubiquity 0.1.2 User Tutorial|简体中文]] [[it:Ubiquity 0.1.2 User Tutorial|italiano]] [[de:Ubiquity 0.1.2 User Tutorial|Deutsch]] | |||
[[ja:Ubiquity 0.1.2 User Tutorial| | [[ru:Ubiquity 0.1.2 User Tutorial|русски]] [[fr:Ubiquity 0.1.2 User Tutorial|français]] [[pt:Ubiquity 0.1.2 User Tutorial|português]] | ||
[[ru:Ubiquity 0.1.2 User Tutorial| | |||
= はじめに = | = はじめに = | ||
Ubiquity | Ubiquity はあなたのWebにおける体験を強力に新しくする、Firefox の実験的な拡張機能です。 | ||
<!-- | <!-- | ||
Ubiquity is an experimental Firefox extension that gives you a powerful new way to interact with the Web. | Ubiquity is an experimental Firefox extension that gives you a powerful new way to interact with the Web. | ||
| Line 27: | Line 26: | ||
http://www.toolness.com/images/20080819151657.jpg | http://www.toolness.com/images/20080819151657.jpg | ||
Ubiquity のコマンドの可能性はほぼ無限大です。Ubiquity と各種コマンドを利用すれば、あなたの Web 上での作業はより速く、より簡単になる事でしょう。このチュートリアルでは、その一部を紹介します。そしてこのチュートリアルが終わる頃には、あなたは Wikipedia、 Google、 definition、 Yelp でスピーディーに検索したり、メールに地図を挿入したり、 Web | Ubiquity のコマンドの可能性はほぼ無限大です。Ubiquity と各種コマンドを利用すれば、あなたの Web 上での作業はより速く、より簡単になる事でしょう。このチュートリアルでは、その一部を紹介します。そしてこのチュートリアルが終わる頃には、あなたは Wikipedia、 Google、 definition、 Yelp でスピーディーに検索したり、メールに地図を挿入したり、 Web ページの一部を翻訳したり、単語をハイライトして友達にメールで送りつけたり、等といった事が出来るようになっているでしょう。 | ||
<!-- | <!-- | ||
Ubiquity commands can do nearly anything. Ubiquity comes with a set of commands that make common Web tasks faster and easier. In this tutorial we'll teach you how to use some of them. By the end of this tutorial you'll be able to perform quick Wikipedia, Google, definition, and Yelp searches; add maps to your email; and translate a snippet of a web page, highlight a word, and then email it to a friend. | Ubiquity commands can do nearly anything. Ubiquity comes with a set of commands that make common Web tasks faster and easier. In this tutorial we'll teach you how to use some of them. By the end of this tutorial you'll be able to perform quick Wikipedia, Google, definition, and Yelp searches; add maps to your email; and translate a snippet of a web page, highlight a word, and then email it to a friend. | ||
| Line 38: | Line 37: | ||
--> | --> | ||
Ubiquity は進行中のプロジェクトですので、協力して下さる方は歓迎いたします。このチュートリアルを読んで、Ubiquity がより使いやすくなる方法や、今後の開発に役に立つような事を思い付いついたなら、[http://getsatisfaction.com/mozilla/products/mozilla_ubiquity 是非お聞かせください]。Ubiquity | Ubiquity は進行中のプロジェクトですので、協力して下さる方は歓迎いたします。このチュートリアルを読んで、Ubiquity がより使いやすくなる方法や、今後の開発に役に立つような事を思い付いついたなら、[http://getsatisfaction.com/mozilla/products/mozilla_ubiquity 是非お聞かせください]。Ubiquity は、まだ始まったばかりです。あなたにもこのプロジェクトの方向性を決めるチャンスがあるのです。 | ||
<!-- | <!-- | ||
Ubiquity is still a work in progress, and we are eager for you to join our virtual team to experiment. If, when reading this tutorial, you think of a way to make Ubiquity easier to use, or an idea for its future development, we hope you'll take a moment to [http://getsatisfaction.com/mozilla/products/mozilla_ubiquity share your thoughts]. By getting involved with Ubiquity while the project is still in its early stages, you have an opportunity to shape the direction of its growth. | Ubiquity is still a work in progress, and we are eager for you to join our virtual team to experiment. If, when reading this tutorial, you think of a way to make Ubiquity easier to use, or an idea for its future development, we hope you'll take a moment to [http://getsatisfaction.com/mozilla/products/mozilla_ubiquity share your thoughts]. By getting involved with Ubiquity while the project is still in its early stages, you have an opportunity to shape the direction of its growth. | ||
--> | |||
==Macをご利用の場合== | |||
[http://growl.info/ Growl]のインストールが必要です。この Mac OS X のシステム拡張機能により、控えめに透過されたメッセージの表示が可能になります。 Ubiquity は 、コマンドからの出力や、エラーメッセージの表示に、Growl の通知機能を利用しています。 | |||
<!-- | |||
You'll need to install [http://growl.info/ Growl]. This is a Mac OS X system extension that applications can use to display unobtrusive transparent messages. Ubiquity uses Growl notifications to show you the output of commands and tell you about errors. | |||
--> | |||
Windows(XP またはそれ以上) であれば、何もインストールする必要はありません。Ubiquity はシステム組み込みの"トースター"風のポップアップメッセージを出力します。 | |||
<!-- | |||
On Windows (XP and later), you don't need to install anything special, as Ubiquity will use the operating system's built-in "toaster"-style pop-up messaging. | |||
--> | |||
Linux も、必要な物は特にありません。ただし、Firefox は最新版にしておいて下さい。 | |||
<!-- | |||
On Linux, you shouldn't have to do anything special: just make sure you're updated to the latest version of Firefox. | |||
--> | |||
= 入門編 = | |||
== Ubiquity の セットアップ == | |||
まず、 [https://people.mozilla.com/~avarma/ubiquity-0.1.xpi Ubiquity をインストールして下さい]。インストールが完了したら、Mac ユーザーの方は '''option+space''' を、 Windows の方は '''control+space''' を、 Linux の方は '''alt+space''' を押してみて下さい。 | |||
<!-- | |||
If you haven't already done so, [https://people.mozilla.com/~avarma/ubiquity-0.1.xpi install Ubiquity]. Once you've done that, you can summon Ubiquity by tapping '''option-space''' on the Mac, or '''control-space''' if you're on Windows. On Linux, try '''alt-space''' | |||
--> | |||
上記の同時押しが上手く行った場合、ブラウザの左上に、白いカーソルが点滅している、黒くて透明な何かしらが現れます。 | |||
<!-- | |||
Once you hit the appropriate key-combo, you'll be presented with a transparent black box, with a blinking white cursor, in the upper-left of your browser. | |||
--> | |||
http://www.toolness.com/images/20080714190900.jpg | |||
コマンドは、この状態で入力します。何かテキトウに入力して、エンターキーを押します。話を簡単にするために、これからはこの一連の行為を、コマンドを "発行" すると表現します。 "'XYZ'を発行します" と言う表現は、 "alt+space (又は ctrl+space) を押して Ubiquity を開き、XYZ とタイプします" と言う意味です。 | |||
<!-- | |||
You give Ubiquity a command by typing something in here and then hitting the Enter key. For the sake of brevity, we'll call this "issuing" a command. For the rest of this tutorial, when we say to "issue 'XYZ'", we mean "hit alt-space (or ctrl-space) to bring up the Ubiquity box, then type XYZ". | |||
--> | |||
== コマンド其の一: Wikipedia 検索 == | |||
Wikipediaから始めてみましょう。あなたが babel fish について知りたいとします。この場合、"wikipedia babel fish" を発行してみて下さい。 | |||
<!-- | |||
Let's start with Wikipedia. Say you want to know what a "babel fish" is. You simply issue "wikipedia babel fish". | |||
--> | |||
コマンドをタイプしている間、コマンド入力欄の下に、2つの物が表示されます。現在のコマンドの、'''入力候補''' (suggestion list)、そして '''プレビュー''' です。以下の画像は、 プレビューに "Searches Wikipedia" と表示され、入力候補に "wikipedia" と "weather" が挙がっている状態を示したものです。 | |||
<!-- | |||
While you're typing your command, you'll see two things underneath the input box: A '''suggestion list''' and a '''preview''' of the current command. In the picture below, the suggestion list consists of "wikipedia" and "weather", while the preview says "Searches Wikipedia". | |||
--> | |||
http://www.toolness.com/images/20080819152417.jpg | |||
"wikipedia babel fish" とタイプし終わったら、Wikipedia 内の Babel Fish に関する様々なページの概要を見る事が出来ます。 | |||
<!-- | |||
When you finish typing "wikipedia babel fish" you should see some summaries of various Wikipedia pages about Babel Fish, like so: | |||
--> | |||
http://www.toolness.com/images/20080819152930.jpg | |||
上記の情報がウィキぺディアから収集されるにはちょっと時間がかかるかもしれませんが、Ubiquity はこの間もバッチリ応答可能です。 | |||
<!-- | |||
It will take a moment for the above information to be gleaned from Wikipedia, but Ubiquity stays fully responsive during this time. | |||
--> | |||
この状態で: | |||
* Enter (又は Return) を押すと、コマンドを'''実行'''することが出来ます。Wikipedia コマンドを実行すれば、Wikipedia のページにジャンプできます。 | |||
* Escape を押せば、コマンドは'''キャンセル'''できます。 Ubiquity は何もせず消えます。 | |||
* プレビューの'''リンク'''をクリックする事も出来ます。 Wikipedia コマンドのプレビューの場合、気になるリンクをクリックすれば、直接その記事にジャンプできます。 | |||
<!-- | |||
Next, you can: | |||
* Hit Enter (or Return) to '''execute''' the command. Executing the Wikipedia command has the effect of taking you to the Wikipedia page. | |||
* Hit Escape to <b>cancel</b> the command. Ubiquity disappears with no effect. | |||
* Click on one of the <b>links</b> in the preview. In the case of the Wikipedia preview, clicking a link will take you directly to the article you're interested in. | |||
--> | |||
== コマンドの短縮と入力候補の利用 == | |||
"Wikipedia babel fish" とタイプするのはかなり大変ですが、 Ubiquity の入力候補機能を利用すれば、そんな涙ぐましい努力は必要ありません。前のセクションで見たように、Ubiquityを立ち上げ、 "w" とだけタイプすれば、Wikipedia と Weather が入力候補として表示されます。 | |||
<!-- | |||
"Wikipedia babel fish" is quite a lot to type. You can save some wear and tear on your fingers by letting Ubiquity's suggestion list do the work for you. As you saw in the last section, bringing up Ubiquity and typing only "w" presents you with suggestions of all the commands that start with that letter: namely, Wikipedia and Weather. | |||
--> | |||
続いて "i" をタイプすると、 "wi" で始まる — "Wikipedia" コマンド一つに、候補が絞り込まれます。ここで、(半角) スペースを入力し、任意の文章を続ければ、あなたが取ろうとしている行動 ('''verb''') は "wikipedia" であると、Ubiquity は判断します。つまり、 "wi babel fish" を発行するという事は、 "wikipedia babel fish" を発行する事と全く同じです。 | |||
<!-- | |||
When you add the letter "i", the suggestion list narrows down to just the one command that starts with "wi"—"Wikipedia". At this point, you can hit the space bar and type the rest of your sentence, and Ubiquity will know that the verb you want to use is "wikipedia". So issuing "wi babel fish" is the exact same thing as issuing "wikipedia babel fish". | |||
--> | |||
別の例を示します。 シカゴの天気を知りたいとします。"w chicago" を発行してみましょう。 | |||
<!-- | |||
Let's try another example. Suppose you want to know what the weather is like in Chicago. Try issuing "w chicago". | |||
--> | |||
http://www.toolness.com/images/20080819155204.jpg | |||
最初の入力候補は "wikipedia chicago" です。 ここで Return キーを叩けば、このコマンドは実行されます。でも、これが今回やりたかった事ではありません。そこで、代わりに'''下矢印キー'''を押してみましょう。2 番目の入力候補である、 "weather chicago" がハイライトされます。 | |||
<!-- | |||
You'll see that the top suggestion is "wikipedia chicago". If you hit the Return key now, this is the command that will be executed. But that's not what we want right now, so hit the <b>down arrow key</b> instead, to highlight the second suggestion: "weather chicago" | |||
--> | |||
無事にシカゴの天気予報がプレビューに表示されました。Return キーを押せば、Wunderground.com の、詳細な天気予報のページにジャンプできます。 | |||
<!-- | |||
You can now see a preview of the weather forecast for Chicago. Hit return to go to the full weather report page on Wunderground.com. | |||
--> | |||
もちろん、"we chicago" でも、"we 60601" (シカゴの郵便番号です) でも、同じ結果を得る事が出来ます。 | |||
<!-- | |||
Of course, you could have just issued "we chicago", or even "we 60601" (that's a Chicago zip code) to get the same results. | |||
--> | |||
== 選択範囲 (selection) を使ってコマンドを実行する == | |||
たった今見ている Web ページの何かについて、検索してみたい・・・こういった状況は割とあると思います。検索したいものはそこにあるのに、わざわざもう一度タイプするなんて・・・。 | |||
<!-- | |||
Often, the thing you're interested in searching for is right in front of you, on the web page you're looking at. Why go to the trouble of re-typing it when you can use what you've already got? | |||
--> | |||
マウスをドラッグして、下の "Mountain View, California" を選択して下さい。 | |||
<!-- | |||
Select the words "Mountain View, California" below by dragging your mouse across them: | |||
--> | |||
Mountain View, California | |||
次に Ubiquity を召喚し、何かコマンドを入力してみます。 | |||
<!-- | |||
Now summon Ubiquity, and just type the first few letters of the command name: | |||
--> | |||
http://www.toolness.com/images/20080819155845.jpg | |||
Web ページで見知らぬ単語を見かけたら・・・ | |||
<!-- | |||
Or, let's say you're reading a web page and you find an unfamiliar word: | |||
--> | |||
aglet | |||
上の単語を選択して、 "define" を発行してみて下さい。 | |||
<!-- | |||
Just select the word and issue "define". | |||
--> | |||
これは、"define aglet" を発行するのと同じ事です。"def aglet" も、"def '''this'''" とも同じです (Ubiquity は、"this" を選択範囲 ('''selection''') であると判断します)。 | |||
<!-- | |||
You could have achieved the same thing by typing "define aglet"—or just "def aglet", or even "def this". (Ubiquity understands "this" to refer to the selection.) | |||
--> | |||
= 更なるコマンドの例 = | |||
== Email コマンド == | |||
現在、 email コマンドは [http://mail.google.com Google Mail] を利用しています。この事は、次のパートのチュートリアルを進めるために、GMail のアカウントが必要になる事を意味します。もちろん、[http://www.mozilla.com/en-US/thunderbird/ Thunderbird] のように、このコマンドも最終的にはあらゆる Web ベースの email プロバイダに対応するべきです (もしもあなたがプログラマーなら、[http://groups.google.com/group/ubiquity-firefox これに関して手助けしていただけると幸いです])。GMail のアカウントをお持ちならば、ログインしている事を確認してください。お持ちでなければ、本パートはスキップしていただいても構いません。 | |||
<!-- | |||
Right now, the email command uses [http://mail.google.com Google Mail]. That means you'll only be able to follow along with the next part of the tutorial if you have a GMail account. Eventually, of course, the command should work with all major web-based email providers, as well as applications like [http://www.mozilla.com/en-US/thunderbird/ Thunderbird]. (If you're a programmer, [http://groups.google.com/group/ubiquity-firefox we'd love some help with that].) For now, if you have a GMail account, please make sure you're logged in. If you don't, you might want to skip ahead to the next part of the tutorial. | |||
--> | |||
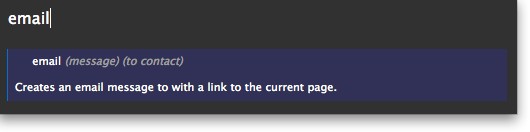
GMail にログインしている状態で、 "email" を発行してください。入力候補に、 "Email (message) (to contact)" と表示されます。 | |||
<!-- | |||
Assuming you're logged into your GMail account, issue "email". In the suggestion list, you'll see a suggestion that says "Email (message) (to contact)". | |||
--> | |||
http://www.toolness.com/images/20080819160313.jpg | |||
このことは、Email コマンドが二つの情報を期待している事を示す手がかりとなります。"message" とは'''何を'''メールするか、そして "contact" とは'''誰に'''送るかを示します。また、これらの情報のうちどちらかを省略しても、 Email コマンドは動作します。例を示します。 | |||
<!-- | |||
This is a clue that the Email command expects two pieces of information: the message is <b>what</b> you're emailing, and the contact is <b>who</b> you want to send it to. However, you can leave out one of these things — or both of them — and the Email command will still work. So I can issue any of these commands: | |||
--> | |||
* "email hello" | |||
* "email to chris" | |||
* "email hello to chris" | |||
* "email to chris hello" | |||
"Chris" の名前を使ったのは、筆者の GMail の連絡先に彼が登録されているからです。あなたの連絡先に "Chris" の名前が無いなら、連絡先に登録されている、誰か別の友人の名前を使って例のコマンドを差し替えてください。 | |||
<!-- | |||
I'm using "chris" because that's the name of someone in my GMail contacts list. If you don't have a "chris" in your contacts list, just substitute the name of any of your friends in these examples. | |||
--> | |||
筆者が面白い Web ページを見つけて、それをクリスに送りたいと考えたとします。筆者は、 "email this to chris" を発行する事によって、リンクや画像、その他諸々を含むページの一部を選択することが出来ます。Ubiquity は "this" を選択範囲であると判断します ("email it to chris" とも、 "email selection to chris" とも出来ます。これらは全て同じ意味です)。選択された部分はプレビューに表示されます。 | |||
<!-- | |||
Let's say I've found an interesting fact on a web page and I want to send it to Chris. I can select part of the page, including links, pictures, and anything else, and then issue "email this to chris". Ubiquity understands "this" to refer to my selection. (I could also have said "email it to chris" or "email selection to chris" -- all of these are equivalent.) The selected part of the page shows up in my preview: | |||
--> | |||
[[Image:Email-picture-selection.png]] | |||
(メールアドレスの部分はぼかしを入れてあります。) 筆者の GMail の連絡先にはクリスと言う名前が複数存在するので、入力候補には複数表示されています。下矢印を押してどのクリスにメールを送るか選択し、Enter キーを叩いてみます。 | |||
<!-- | |||
(Actual email addresses blurred out to protect the innocent.) Since I know several people named Chris, there are several lines in the suggestion list -- one each Chris in my GMail contacts list. I can arrow-key down to the Chris I want and then hit the Enter key. | |||
--> | |||
"メールを作成" の画面にジャンプしました。先程選択したページの一部は、email の本文に再現され、"To" には先程選択したメールアドレスが挿入されており、件名には先程のページのタイトルが設定されています。"送信" ボタンを押す前に、何か付け加えたい事があれば、ここで自由に編集できます。 | |||
<!-- | |||
I'm taken to the GMail "compose new email" page. The chunk of the page that I selected is reproduced in the body of my email, the "to" field is filled with the email address I selected, and the "subject" field contains the title of the web page I was on. I can now edit this email to add anything else I want to say, before clicking "Send". | |||
--> | |||
== Map コマンド == | |||
'''訳注: map コマンドは単体で利用できますが、入力フォームへの地図画像の挿入 (この例では Gmail が使用されています) が出来ないサイトもあります。''' | |||
友人とレストランで会う予定を立てていて、メールにその地図を添えたいとします (これは、筆者・Aza のお気に入りの例です)。 | |||
<!-- | |||
Let's say you're arranging to meet up with a friend at a restaurant, and you want to include a map in the email. (Yes, it's Aza's favorite example.) | |||
--> | |||
メール本文 ('''訳注: Gmailの本文入力フォームの事です。''') に住所を入力したら、それを選択して "map" を発行します。すると、入力した場所の、サムネイルサイズの地図 (Google マップを利用しています) がプレビューに表示されます。 | |||
<!-- | |||
Type out the address you want to map, then select it and issue "map". In the preview, you'll see a thumbnail-size map of the area (from Google Maps). | |||
--> | |||
[[Image:Map-preview-1.png]] | |||
コマンドを実行すれば、Google マップページにジャンプできます。また、プレビューの地図をクリックすれば画像が拡大され、より機能が豊富な状態で利用する事が出来ます。"insert map in page" をクリックすれば、スクロールやズームでお好みの状態にした地図の画像が、メールの本文に挿入されます。 | |||
<!-- | |||
If you execute the command, you'll be taken to the Google Maps page. Or, you can click on the image in the preview to get a larger, interactive version. After scrolling and zooming this map to your liking, you can click the "insert map in page" link to insert the map into your email. | |||
--> | |||
[[Image:Map-preview-2.png]] | |||
以下のアドレスを選択し、 "map" を発行してみてください。 | |||
<!-- | |||
You can give it a try by selecting the address below and issuing "map": | |||
--> | |||
東京都渋谷区桜丘町26-1 セルリアンタワー | |||
地図画像をクリックすると拡大されること、そして "insert map in page" のリンクをクリックすると起こることを確認して下さい。驚きましたか? | |||
<!-- | |||
Then click the image in the preview to get the larger map, then click the "insert map in page" link and watch what happens. Surprised? | |||
--> | |||
== 翻訳 command == | |||
ここまで読み進めて来られた方ならば、Ubiquity が Web ページの改変を可能にする事にお気付きかも知れません。分かりやすい例として、"translate" コマンドを紹介します。以下の文章を選択して、"translate" (または "tra" だけでも構いません) を発行し、実行してみてください。 | |||
<!-- | |||
That's right, Ubiquity commands can alter the contents of a page, even if the page wouldn't normally be editable. A command that makes good use of this ability is the "Translate" command. To try it, select the text below and issue "translate" (or just "tra") and execute. | |||
--> | |||
In the 21st century, globalization must be considered carefully. | |||
機械翻訳ですので、結果は若干ぎこちないですが、大体の意味は掴めると思います。 | |||
<!-- | |||
It's translation-by-machine, so the results are bound to sound awkward, but at least you can get the gist of the meaning. | |||
--> | |||
省略無しのコマンドは以下の通りです。 | |||
<!-- | |||
The full command is | |||
--> | |||
translate (text) (from language) (to language) | |||
"from language" で翻訳対象の言語を指定し、"to language" でどの言語に翻訳するかを指定できるようになっています。どちらかを入力しなかった場合は、Ubiquity がテキトウに判断してやってくれます。 | |||
<!-- | |||
So you can specify what language you want to translate from, and what language you want to translate to. If you leave either of these out, Ubiquity will just make a guess about what you want. | |||
--> | |||
以下に別のコマンド発行例を示しておきます。 | |||
<!-- | |||
Here are some other examples you can try: | |||
--> | |||
* "tr こんばんは! to spanish" | |||
* "tr buenas tardes from spanish to french" | |||
* 現在のページ中の英文を選択して: "translate this to german" | |||
= その他諸々 = | |||
<!-- | |||
= Going Further = | |||
--> | |||
== ヘルプページの参照と、インストールされているコマンドの探し方 == | |||
<!-- | |||
== Getting Help and Discovering Commands == | |||
--> | |||
*いったいどれだけのコマンドがあるのか? | |||
*それらの名前は? | |||
*それら全てを、丸暗記する必要があるのか? | |||
<!-- | |||
By now you're probably wondering, "How many commands are there? What are they all called? How am I supposed to know what a command could be unless I memorize them all?" | |||
--> | |||
よくぞ聞いて下さいました! "command-list" を発行し、Enterキーを叩いて下さい。全てのコマンドと、その機能が一覧表示されているスペシャルページにジャンプできます。 | |||
<!-- | |||
These are good questions! To start getting some answers, issue the "command-list" command, and hit Return to execute it. You'll be taken to a special page listing every command you have installed, and describing what each one does. | |||
--> | |||
[[Image:Command-list.png]] | |||
もっと一般的なヘルプが見たければ、 "help" を発行してください。Ubiquity を立ち上げるホットキーの変更や、コマンドの (アン) インストール等をここで実施する事が出来ます。 | |||
<!-- | |||
For more general help, you can execute the "help" command. Here, you can change the hotkey that you use to activate Ubiquity, un-subscribe from command feeds, and so on. | |||
--> | |||
このヘルプページと command-list のページは相互にリンクしており、どれを開いても、シングルクリックで相互に行き来できます。 | |||
<!-- | |||
The general help page and the command-list page link to each other, so whichever one you open, you can get to the other with a single click. | |||
--> | |||
ヘルプページには、URLバーに '''about:ubiquity''' と打ち込んでも移動する事が出来ます。 | |||
<!-- | |||
You can also get to the main help page by typing '''about:ubiquity''' into the Firefox URL bar. | |||
--> | |||
== コマンドの埋め込みとインストール、セキュリティリスクに関して == | |||
<!-- | |||
== Teaching Ubiquity New Commands == | |||
--> | |||
Ubiquity のコマンドが誰でも作成可能である事は、既にお伝えしました。作成したコマンドは、どのWebページにでも埋め込む事が出来ます。Ubiquity がインストールされた Firefox で、埋め込まれたページに行くと、コマンドのインストールオプションが表示されます。 | |||
<!-- | |||
We've mentioned that anyone can create Ubiquity commands. Once created, these commands can be embedded in any web page. If you have Ubiquity installed and you visit a page with an embedded command, Firefox will present you with the option of <b>subscribing</b> to the command. | |||
--> | |||
サンプルページは[http://hg.toolness.com/ubiquity-firefox/raw-file/7435416f211a/examples/sample-cmd.html コチラ] (Atul's personal site) です。アクセスすると、コマンドをインストールするかを問うバーが、画面上部に生えてくる筈です。 | |||
<!-- | |||
To see this in action, you can visit [http://hg.toolness.com/ubiquity-firefox/raw-file/7435416f211a/examples/sample-cmd.html this example page on Atul's personal site]. You should see a bar coming down from the top of the browser window asking you whether you want to subscribe to the command or not. | |||
--> | |||
http://www.toolness.com/images/20080820111209.jpg | |||
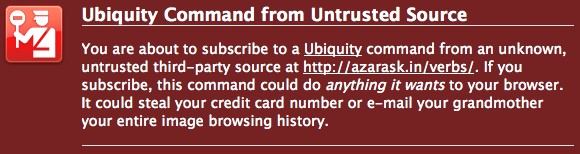
インストールする事を選択すると、禍々しい画面が表示されます。 | |||
<!-- | |||
If you choose to subscribe, you'll see a rather scary-looking warning page: | |||
--> | |||
http://www.toolness.com/images/20080820111725.jpg | |||
'''信頼できないサイトからの Ubiquity のコマンドのインストールには、セキュリティ上のリスクが伴います。'''Ubiquity コマンドは何でもできます。あなたのブラウザにフルアクセスして、危険なサイトに誘導したり、個人情報を盗むばかりか、あなたのPCの全データを永遠に抹消してしまったり、ウィルス的な何かを自由にインストールさせたりできるのです。十分に信頼できると判断できない限りは、コマンドのインストールはしないのが無難です。 | |||
<!-- | |||
It's important to understand the '''dangers''' of subscribing to Ubiquity commands from sites that you don't trust. Since a Ubiquity command can do anything, and it has full access to your web browser, a bad person could write a Ubiquity command to steal your personal information or do malicious things to your computer. You should not install Ubiquity commands unless you are confident that the source is trustworthy. | |||
--> | |||
将来的には、信頼できるコマンドの情報を共有できる、"トラストネットワーク" と呼ばれる何かしらが開発される予定です。コマンドが埋め込まれているページにアクセスすると、そのコマンドに関する他人の意見を参照し、そのコマンドが危険かどうか、知る事ができるようになります。このシステムはまだ存在しませんが、完成した暁には、このチュートリアルで利用方法などを解説したいと思います。 | |||
<!-- | |||
In the future, we'll be creating something called a "trust network" that Ubiquity users can use to share knowledge about which commands are trustworthy. When you visit a page with an embedded command, you'll be able to see what your friends with Ubiquity have said about this command -- whether they've given it a thumbs-up or left you a warning to let you know it could be dangerous. This system doesn't exist yet, but once it does we will modify this section of the tutorial to let you know how to use it. | |||
--> | --> | ||
Latest revision as of 10:48, 7 June 2009
戻る.
日本語 English español 简体中文 italiano Deutsch русски français português
はじめに
Ubiquity はあなたのWebにおける体験を強力に新しくする、Firefox の実験的な拡張機能です。
どこかのページへ移動したい場合、これまでなら、あなたは URL バーにアドレスを打ち込んで、Firefoxに行き先を伝えていたと思います。
Ubiquity をインストールすれば、あなたは言葉を使って、 Firefox にあなたが何をしたいかを伝える事が出来ます。これをコマンドと呼びます。

Ubiquity のコマンドの可能性はほぼ無限大です。Ubiquity と各種コマンドを利用すれば、あなたの Web 上での作業はより速く、より簡単になる事でしょう。このチュートリアルでは、その一部を紹介します。そしてこのチュートリアルが終わる頃には、あなたは Wikipedia、 Google、 definition、 Yelp でスピーディーに検索したり、メールに地図を挿入したり、 Web ページの一部を翻訳したり、単語をハイライトして友達にメールで送りつけたり、等といった事が出来るようになっているでしょう。
Ubiquity にデフォルトで入っているコマンドは、飽くまでもその可能性の第一歩です。誰でも新しいコマンドを自作し、共有する事が出来るのです。コマンドを作成し、 - Web を拡張する - こと。それは Web ページを作成することと同じくらい簡単です。もし自分でコマンドを作ってみたくなったら、開発者用チュートリアルをチェックしてみて下さい。
Ubiquity は進行中のプロジェクトですので、協力して下さる方は歓迎いたします。このチュートリアルを読んで、Ubiquity がより使いやすくなる方法や、今後の開発に役に立つような事を思い付いついたなら、是非お聞かせください。Ubiquity は、まだ始まったばかりです。あなたにもこのプロジェクトの方向性を決めるチャンスがあるのです。
Macをご利用の場合
Growlのインストールが必要です。この Mac OS X のシステム拡張機能により、控えめに透過されたメッセージの表示が可能になります。 Ubiquity は 、コマンドからの出力や、エラーメッセージの表示に、Growl の通知機能を利用しています。
Windows(XP またはそれ以上) であれば、何もインストールする必要はありません。Ubiquity はシステム組み込みの"トースター"風のポップアップメッセージを出力します。
Linux も、必要な物は特にありません。ただし、Firefox は最新版にしておいて下さい。
入門編
Ubiquity の セットアップ
まず、 Ubiquity をインストールして下さい。インストールが完了したら、Mac ユーザーの方は option+space を、 Windows の方は control+space を、 Linux の方は alt+space を押してみて下さい。
上記の同時押しが上手く行った場合、ブラウザの左上に、白いカーソルが点滅している、黒くて透明な何かしらが現れます。

コマンドは、この状態で入力します。何かテキトウに入力して、エンターキーを押します。話を簡単にするために、これからはこの一連の行為を、コマンドを "発行" すると表現します。 "'XYZ'を発行します" と言う表現は、 "alt+space (又は ctrl+space) を押して Ubiquity を開き、XYZ とタイプします" と言う意味です。
コマンド其の一: Wikipedia 検索
Wikipediaから始めてみましょう。あなたが babel fish について知りたいとします。この場合、"wikipedia babel fish" を発行してみて下さい。
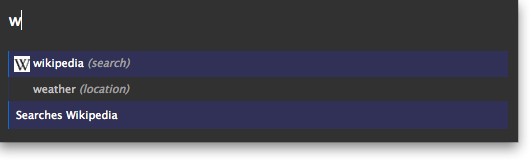
コマンドをタイプしている間、コマンド入力欄の下に、2つの物が表示されます。現在のコマンドの、入力候補 (suggestion list)、そして プレビュー です。以下の画像は、 プレビューに "Searches Wikipedia" と表示され、入力候補に "wikipedia" と "weather" が挙がっている状態を示したものです。
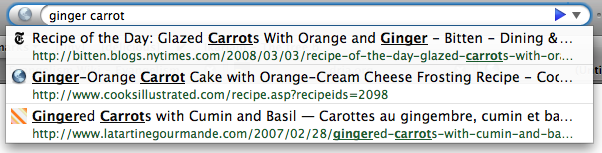
"wikipedia babel fish" とタイプし終わったら、Wikipedia 内の Babel Fish に関する様々なページの概要を見る事が出来ます。
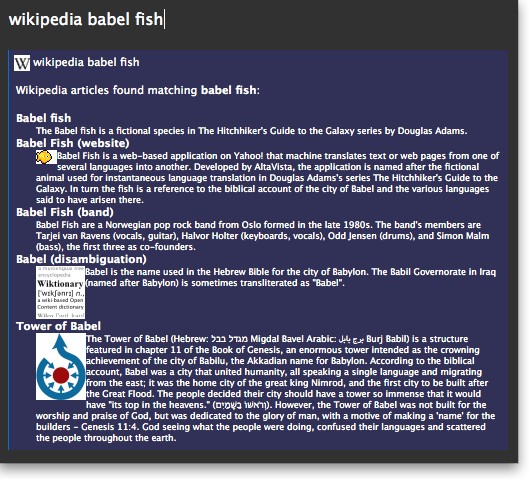
上記の情報がウィキぺディアから収集されるにはちょっと時間がかかるかもしれませんが、Ubiquity はこの間もバッチリ応答可能です。
この状態で:
- Enter (又は Return) を押すと、コマンドを実行することが出来ます。Wikipedia コマンドを実行すれば、Wikipedia のページにジャンプできます。
- Escape を押せば、コマンドはキャンセルできます。 Ubiquity は何もせず消えます。
- プレビューのリンクをクリックする事も出来ます。 Wikipedia コマンドのプレビューの場合、気になるリンクをクリックすれば、直接その記事にジャンプできます。
コマンドの短縮と入力候補の利用
"Wikipedia babel fish" とタイプするのはかなり大変ですが、 Ubiquity の入力候補機能を利用すれば、そんな涙ぐましい努力は必要ありません。前のセクションで見たように、Ubiquityを立ち上げ、 "w" とだけタイプすれば、Wikipedia と Weather が入力候補として表示されます。
続いて "i" をタイプすると、 "wi" で始まる — "Wikipedia" コマンド一つに、候補が絞り込まれます。ここで、(半角) スペースを入力し、任意の文章を続ければ、あなたが取ろうとしている行動 (verb) は "wikipedia" であると、Ubiquity は判断します。つまり、 "wi babel fish" を発行するという事は、 "wikipedia babel fish" を発行する事と全く同じです。
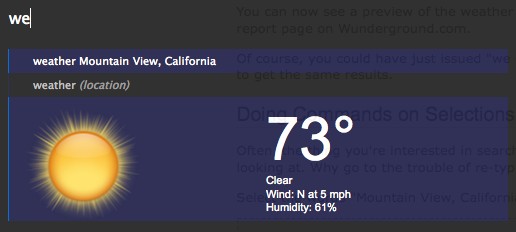
別の例を示します。 シカゴの天気を知りたいとします。"w chicago" を発行してみましょう。

最初の入力候補は "wikipedia chicago" です。 ここで Return キーを叩けば、このコマンドは実行されます。でも、これが今回やりたかった事ではありません。そこで、代わりに下矢印キーを押してみましょう。2 番目の入力候補である、 "weather chicago" がハイライトされます。
無事にシカゴの天気予報がプレビューに表示されました。Return キーを押せば、Wunderground.com の、詳細な天気予報のページにジャンプできます。
もちろん、"we chicago" でも、"we 60601" (シカゴの郵便番号です) でも、同じ結果を得る事が出来ます。
選択範囲 (selection) を使ってコマンドを実行する
たった今見ている Web ページの何かについて、検索してみたい・・・こういった状況は割とあると思います。検索したいものはそこにあるのに、わざわざもう一度タイプするなんて・・・。
マウスをドラッグして、下の "Mountain View, California" を選択して下さい。
Mountain View, California
次に Ubiquity を召喚し、何かコマンドを入力してみます。
Web ページで見知らぬ単語を見かけたら・・・
aglet
上の単語を選択して、 "define" を発行してみて下さい。
これは、"define aglet" を発行するのと同じ事です。"def aglet" も、"def this" とも同じです (Ubiquity は、"this" を選択範囲 (selection) であると判断します)。
更なるコマンドの例
Email コマンド
現在、 email コマンドは Google Mail を利用しています。この事は、次のパートのチュートリアルを進めるために、GMail のアカウントが必要になる事を意味します。もちろん、Thunderbird のように、このコマンドも最終的にはあらゆる Web ベースの email プロバイダに対応するべきです (もしもあなたがプログラマーなら、これに関して手助けしていただけると幸いです)。GMail のアカウントをお持ちならば、ログインしている事を確認してください。お持ちでなければ、本パートはスキップしていただいても構いません。
GMail にログインしている状態で、 "email" を発行してください。入力候補に、 "Email (message) (to contact)" と表示されます。
このことは、Email コマンドが二つの情報を期待している事を示す手がかりとなります。"message" とは何をメールするか、そして "contact" とは誰に送るかを示します。また、これらの情報のうちどちらかを省略しても、 Email コマンドは動作します。例を示します。
- "email hello"
- "email to chris"
- "email hello to chris"
- "email to chris hello"
"Chris" の名前を使ったのは、筆者の GMail の連絡先に彼が登録されているからです。あなたの連絡先に "Chris" の名前が無いなら、連絡先に登録されている、誰か別の友人の名前を使って例のコマンドを差し替えてください。
筆者が面白い Web ページを見つけて、それをクリスに送りたいと考えたとします。筆者は、 "email this to chris" を発行する事によって、リンクや画像、その他諸々を含むページの一部を選択することが出来ます。Ubiquity は "this" を選択範囲であると判断します ("email it to chris" とも、 "email selection to chris" とも出来ます。これらは全て同じ意味です)。選択された部分はプレビューに表示されます。

(メールアドレスの部分はぼかしを入れてあります。) 筆者の GMail の連絡先にはクリスと言う名前が複数存在するので、入力候補には複数表示されています。下矢印を押してどのクリスにメールを送るか選択し、Enter キーを叩いてみます。
"メールを作成" の画面にジャンプしました。先程選択したページの一部は、email の本文に再現され、"To" には先程選択したメールアドレスが挿入されており、件名には先程のページのタイトルが設定されています。"送信" ボタンを押す前に、何か付け加えたい事があれば、ここで自由に編集できます。
Map コマンド
訳注: map コマンドは単体で利用できますが、入力フォームへの地図画像の挿入 (この例では Gmail が使用されています) が出来ないサイトもあります。
友人とレストランで会う予定を立てていて、メールにその地図を添えたいとします (これは、筆者・Aza のお気に入りの例です)。
メール本文 (訳注: Gmailの本文入力フォームの事です。) に住所を入力したら、それを選択して "map" を発行します。すると、入力した場所の、サムネイルサイズの地図 (Google マップを利用しています) がプレビューに表示されます。

コマンドを実行すれば、Google マップページにジャンプできます。また、プレビューの地図をクリックすれば画像が拡大され、より機能が豊富な状態で利用する事が出来ます。"insert map in page" をクリックすれば、スクロールやズームでお好みの状態にした地図の画像が、メールの本文に挿入されます。

以下のアドレスを選択し、 "map" を発行してみてください。
東京都渋谷区桜丘町26-1 セルリアンタワー
地図画像をクリックすると拡大されること、そして "insert map in page" のリンクをクリックすると起こることを確認して下さい。驚きましたか?
翻訳 command
ここまで読み進めて来られた方ならば、Ubiquity が Web ページの改変を可能にする事にお気付きかも知れません。分かりやすい例として、"translate" コマンドを紹介します。以下の文章を選択して、"translate" (または "tra" だけでも構いません) を発行し、実行してみてください。
In the 21st century, globalization must be considered carefully.
機械翻訳ですので、結果は若干ぎこちないですが、大体の意味は掴めると思います。
省略無しのコマンドは以下の通りです。
translate (text) (from language) (to language)
"from language" で翻訳対象の言語を指定し、"to language" でどの言語に翻訳するかを指定できるようになっています。どちらかを入力しなかった場合は、Ubiquity がテキトウに判断してやってくれます。
以下に別のコマンド発行例を示しておきます。
- "tr こんばんは! to spanish"
- "tr buenas tardes from spanish to french"
- 現在のページ中の英文を選択して: "translate this to german"
その他諸々
ヘルプページの参照と、インストールされているコマンドの探し方
- いったいどれだけのコマンドがあるのか?
- それらの名前は?
- それら全てを、丸暗記する必要があるのか?
よくぞ聞いて下さいました! "command-list" を発行し、Enterキーを叩いて下さい。全てのコマンドと、その機能が一覧表示されているスペシャルページにジャンプできます。

もっと一般的なヘルプが見たければ、 "help" を発行してください。Ubiquity を立ち上げるホットキーの変更や、コマンドの (アン) インストール等をここで実施する事が出来ます。
このヘルプページと command-list のページは相互にリンクしており、どれを開いても、シングルクリックで相互に行き来できます。
ヘルプページには、URLバーに about:ubiquity と打ち込んでも移動する事が出来ます。
コマンドの埋め込みとインストール、セキュリティリスクに関して
Ubiquity のコマンドが誰でも作成可能である事は、既にお伝えしました。作成したコマンドは、どのWebページにでも埋め込む事が出来ます。Ubiquity がインストールされた Firefox で、埋め込まれたページに行くと、コマンドのインストールオプションが表示されます。
サンプルページはコチラ (Atul's personal site) です。アクセスすると、コマンドをインストールするかを問うバーが、画面上部に生えてくる筈です。

インストールする事を選択すると、禍々しい画面が表示されます。
信頼できないサイトからの Ubiquity のコマンドのインストールには、セキュリティ上のリスクが伴います。Ubiquity コマンドは何でもできます。あなたのブラウザにフルアクセスして、危険なサイトに誘導したり、個人情報を盗むばかりか、あなたのPCの全データを永遠に抹消してしまったり、ウィルス的な何かを自由にインストールさせたりできるのです。十分に信頼できると判断できない限りは、コマンドのインストールはしないのが無難です。
将来的には、信頼できるコマンドの情報を共有できる、"トラストネットワーク" と呼ばれる何かしらが開発される予定です。コマンドが埋め込まれているページにアクセスすると、そのコマンドに関する他人の意見を参照し、そのコマンドが危険かどうか、知る事ができるようになります。このシステムはまだ存在しませんが、完成した暁には、このチュートリアルで利用方法などを解説したいと思います。