Firefox OS/Performance/Bisecting Regressions
Bisecting Regressions
This page will walk you through finding and bisecting performance regressions in Firefox OS.
Datazilla
Datazilla makes it easy to spot performance regressions in Firefox OS apps. The page that shows the performance test numbers is here: [1].
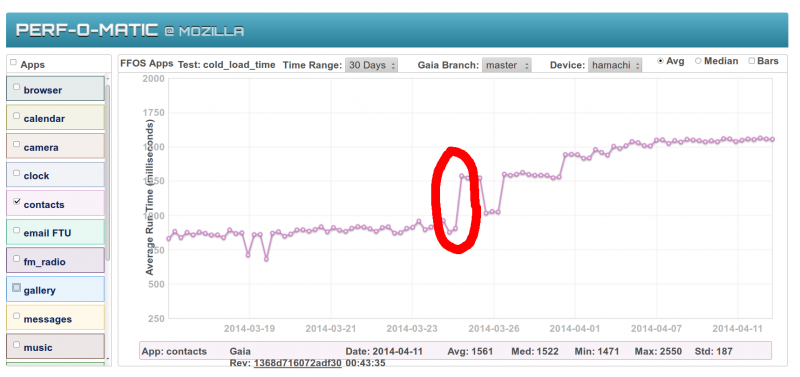
Performance regressions show up as spikes in the graphs like so (circled in red):
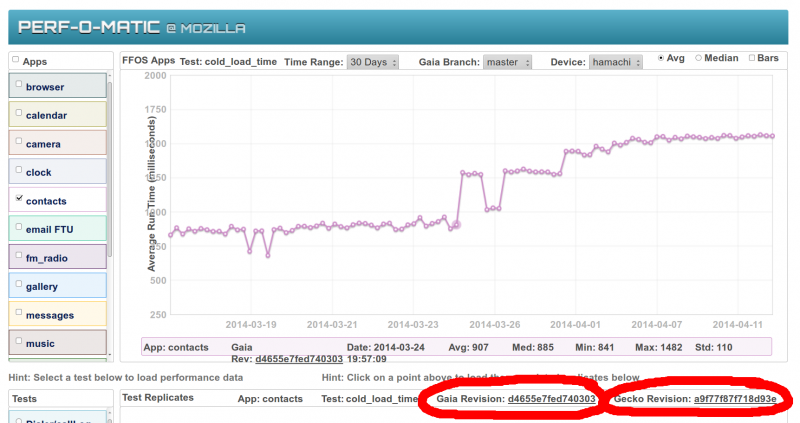
When you find a regression, you need to get the "regression range" for the regression. The regression range is the last known good revision to the first known bad revision for both Gecko and Gaia. To get the last known good revision IDs for both, click on the data point in the graph right before the spike. You will see something like this:
The Gaia and Gecko revisions used in the build and test that generated that data point are shown, circled in red. Write these down. You only need the first 7 characters of the IDs. So in this case you would write down d4655e7 for Gaia and a9f77f8 for Gecko.
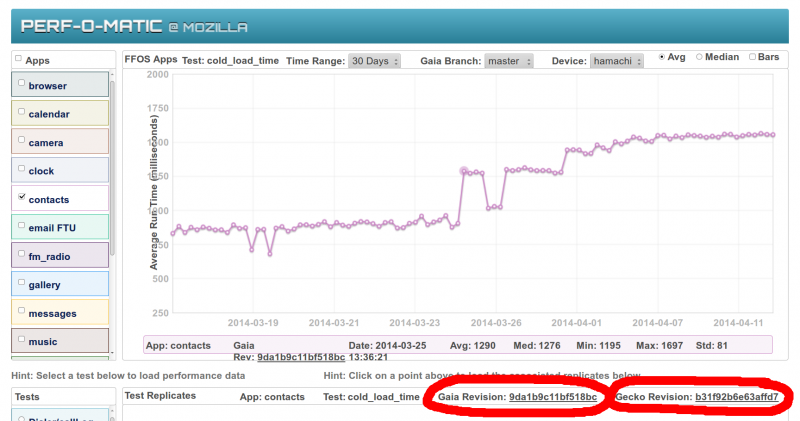
To get the first know bad revision, click on the first data point after the spike. You will see something like this:
Again, you need to write down the revision IDs for both Gecko and Gaia, circled in red. So you would write down 9da1b9c for Gaia and b31f92b for Gecko.
The regression ranges are:
Gecko a9f77f8..b31f92b
Gaia d4655e7..9da1b9c
Setting up for Bisecting
You typically start off by creating a build of the latest master branch code for your device. I'm using the hamachi device in this tutorial because it is the device that Datazilla runs its tests on. To build master, do the following:
$ ./config.sh hamachi
$ ./build.sh -j
$ ./flash.sh
Confirm that it builds, flashes, and the device reboots successfully.
Running b2gperf
This tutorial assumes that you have the b2gperf utility correctly set up on your host PC. If not, follow the instructions.
In our example, we are looking at the Contacts app. To run the tests that datazilla runs, you would execute b2gperf like so:
$ b2gperf --delay=10 --iterations=30 Contacts
These tests sometimes take a while to complete, so be patient. After it is done running, it will print out the results for you to compare to datazilla's numbers. I usually use the median value rather than the average value because it is influenced less by outliers in the gathered data.
Is it in Gecko or Gaia?
The first step in bisecting is to determine if the regression is in Gecko or Gaia. To do this, you have to test all four combinations of Gecko and Gaia revisions from the regression range. You need to test:
- Gecko a9f77f8 + Gaia d4655e7
- Gecko a9f77f8 + Gaia 9da1b9c
- Gecko b31f92b + Gaia d4655e7
- Gecko b31f92b + Gaia 9da1b9c
You use git to check out the correct versions of Gecko and Gaia:
$ cd gecko
$ git checkout a9f77f8
$ cd ../gaia
$ git checkout d4655e7
Now that you have the correct versions of both checked out, time to do another build.
$ cd ..
$ ./build.sh -j
$ ./flash.sh
If the builds completed and the device rebooted correctly after the flash step, you know have a device running the same revisions of Gecko and Gaia as were used to generate the last known good numbers in Datazilla.
Run b2gperf to see if the numbers match those on Datazilla:
$ b2gperf --delay=10 --iterations=30 Contacts
Assuming the numbers match, continue testing the other three combinations. If you find that the numbers are different when you change Gaia but not Gecko, then the regression is in the Gaia code. If the numbers are different when you change Gecko and not Gaia, the regression is in Gecko.
In this example, this regression was in the Gaia code.
Bisecting Gecko/Gaia
To bisect the gaia code, you will use the git bisect command to automate the selection of


